Monday, December 10, 2012

Jack's Ginger Snaps (and picky eaters!)


My oldest son Jack is the pickiest eater in the world.  I know I'm not alone and that many parents are dealing with their own picky eaters, but my son won't even eat "normal" kid foods.  No pizza, pasta, macaroni & cheese, grilled cheese or worst of all - no fruits or vegetables of any kind.  This drives me crazy.  Our pediatrician says he's growing just fine and not to worry, he'll grow out of it.  Well, I do worry, and I'm not quite sure what to do about it.  I do, however, make sure that of the limited foods he does eat, that they are as nutritious as possible even if it's the same foods day in and day out:
For breakfast it's organic milk and homemade waffles (loaded with extra eggs, ground flax, oatmeal and applesauce.)  Lunch is organic, sprouted-grain bread with almond butter.  For diner it's organic chicken nuggets.  I also make sure he has a daily multi-vitamin, a fruit & vegetable "pill", omega-3 tablets and extra Vitamin C.
 

We have tried to get him to eat other things, and he did when he was very young, but as he grew up he got pickier and pickier and the nightly food battles were getting us nowhere and causing tremendous stress in our family.  He claims his taste buds are "different" than ours and that's why he eats the way he does.  I will always worry about his limited eating habits, but he is growing fine and doing well in school, so we'll keep doing what we're doing and hope and pray he branches out with his food choices.  (For the record, my youngest son eats everything: sushi/sashimi, Brussels sprouts, broccoli, asparagus, pickled ginger, sardines, anchovies...quite the extreme)

Because of Jack's "special taste buds" there isn't much I can cook or bake for him that he will eat, so when we discovered that he loved my Ginger Snaps we were thrilled and surprised at the same time because they are rather spicy.  (I know it's just a cookie and who wouldn't love a cookie? but believe me, Jack won't eat just any cookie)   So every year for Christmas I make these Ginger Snaps specially for Jack who thinks they're "awesome."
While I've been baking these cookies for years, I've always felt bad about using one ingredient:  shortening.  There is plenty of butter in the cookie, which is fine, but the shortening is needed to make the cookie perfectly round.  I'm a bit of a perfectionist (perhaps a little OCD) when I bake.  Although Crisco claims to be "trans-fat free" it's full of hydrogenated and partially-hydrogenated crap that I just don't feel good about using even if it's a small amount. This year I used coconut oil instead (in the winter months coconut oil has the same consistency as Crisco) and I'm happy to report the cookies not only taste great but are perfectly round and beautiful!  

  Enjoy!


Jack's Ginger Snaps
2 sticks unsalted butter, room temperature
1/2 cup coconut oil
2 cups of sugar
1 cup of sugar reserved for rolling
4 cups of all-purpose flour
4 teaspoons of baking soda
2 teaspoons ground cinnamon
2 Tablespoons ground ginger
1/2 cup dark molasses
2 large eggs, beaten


1.)  Pre-heat oven to 375 degrees.

2.)  In a bowl, cream butter, coconut oil, and 2 cups of sugar with an electric mixer on medium speed.  In a large bowl, sift together flour, baking soda, cinnamon and ginger.

3.)  Add molasses to butter mixture;  beat to combine.   Beat in eggs until well combined.  Reduce mixer speed to low;  slowly add the reserved flour mixture, a little at a time until well blended.


4.) Place the remaining cup of sugar in a small bowl.  Measure about 2 teaspoons of dough;  roll into a ball and roll dough in sugar.  Transfer to a baking sheet covered with parchment paper.  Repeat, spacing balls 3 inches apart.  Bake for 11 minutes and transfer to a wire rack to cool.


"The Greatest Wealth is Health" - Roman Poet Virgil

"Let Food be thy Medicine and Medicine be thy Food." - Hippocrates

Monday, September 10, 2012

Tomato Tart


If you're wondering what to do with the bounty of tomatoes from your garden, try making them into this delicious tomato tart.  It's fairly easy to make, just a bit time consuming only because the crust has to rest in the refrigerator for 45 minutes, then again for 20 minutes before blind baking it.  To make things easier, you could use a store-bought crust but if you have the time, this homemade version is well worth the trouble. Just plan accordingly and you'll be fine.
I've made this tart twice and have experimented with the crust's ingredients and the one I'm sharing here is what I believe to be the best option.  It calls for all-purpose flour and yellow corn meal but I replaced some of the flour and corn meal with whole-wheat pastry flour which made it, one:  easier to work with, and two: a tastier, more crumbly crust.
The first time I made this I used two large Purple Cherokee heirloom tomatoes.


The second time I used a variety of heirloom tomatoes which gave it this glorious array of colors.  However, I went a bit overboard and used too many tomatoes which took away slightly from the rest of the flavors of the tart.  It was still wonderful, but next time I will stick to only two layers of tomatoes no matter how beautiful they look.


I think I will still make this tart in winter and spring even if I don't have garden fresh tomatoes because it is so good.  I will probably use vine ripe or hot house tomatoes which are acceptable alternatives when garden tomatoes are unavailable because roasting them does improve their taste.  I'm not into canning my tomatoes yet, but I'm sure that would work just fine. :)
Enjoy!

Tomato Tart
3/4 cup all-purpose flour
1/2 cup whole-wheat pastry flour
1/2 cup yellow corn meal
3/4 teaspoon fine sea salt
1 stick cold butter, cut into 1/2 inch pieces
6 Tablespoons freshly grated parmesan-reggiano cheese
2 Tablespoons extra virgin olive oil
1 large red onion, thinly sliced
2 1/4 pounds fresh garden tomatoes
Kosher salt
1 cup Asiago cheese, shredded
1 Tablespoon mayonnaise
1 Tablespoon breadcrumbs
3 Tablespoons each - chopped fresh chives and fresh parsley
1 Tablespoon chopped fresh thyme
Freshly ground pepper

To make the crust:  Pulse flours, cornmeal and fine salt in a food processor to combine.  Add the butter and 3 Tablespoons of parm-reggiano cheese; pulse until the mixture looks like coarse meal with pea-size bits of butter.  Drizzle in 4 Tablespoons of ice water and pulse until the dough comes together; add 1 more Tablespoon ice water if necessary.  Turn out onto a sheet of plastic wrap and pat into a disk with more plastic wrap on top.  Wrap and refrigerate until firm, about 45 minutes.

Keeping the dough between 2 sheets of plastic wrap, roll or press it into a 13-inch round disk.  Transfer the dough to a 9 1/2 inch deep pie/tart plate.  Fold the overhang under itself and crimp the edges.  Pierce the bottom of the crust all over with a fork.  Refrigerate until firm, about 20 minutes.  Meanwhile, preheat the oven to 350 degrees F.

Line the crust with foil, then fill with dried beans (this is blind baking!).  Bake until the edges are golden, about 20 minutes.  Remove the foil and beans and continue baking until golden all over about 10-12 minutes.  Transfer to a rack to cool.

To make the filling: Heat 1 Tablespoon olive oil in a large skillet over medium heat.  Add the onion and cook, stirring until golden about 15 minutes.  Let cool.  Meanwhile, thinly slice tomatoes, toss with 1 teaspoon kosher salt in a colander. Let drain, gently tossing occasionally, about 30 minutes.

Increase the oven temp to 375 degrees F.  In a medium bowl, combine the Asiago cheese, 2 Tablespoons of parm-reggiano, mayo, breadcrumbs, 2 Tablespoons each chives and parsley, the thyme, 1/4 teaspoon each kosher salt and pepper and the sautéed onions.  Spread in the crust.  Arrange the tomatoes on top.  Drizzle with the remaining Tablespoon of olive oil, 1 Tablespoon of parm-reggiano cheese and season with pepper.  Bake until tomatoes are browned, about 40-50 minutes.  Top with remaining chopped chives and parsley.

"The Greatest Wealth is Health" - Roman Poet Virgil

"Let Food be thy Medicine and Medicine be thy Food." - Hippocrates

Wednesday, August 29, 2012

Heirloom Tomatoes


I started planting heirloom tomatoes in my garden just a few years ago and have never looked back. No, they’re not going to win any conventional beauty contests, but like regular garden tomatoes, their taste is far superior to any perfectly round, plump red tomato you’ll find in your neighborhood grocery store.

An heirloom is an open-pollinated or naturally-pollinated (non-hybrid) cultivar of tomato which dates back to the early 50's when people saved their seeds each year for next year's crop.  They look odd and deformed but taste amazing. I like to call them the Steve Buscemi of Tomatoes because they’re “kinda funny-lookin’” but outperform their contemporaries. There are hundreds, even thousands of different varieties each with their own unique color, taste and shape. I also love the names: Green Zebra, Mr. Stripey and Purple Russian to list a few.


two purple cherokees and one brandywine


Tomatoes are loaded with antioxidants, dietary fiber and vitamins, and they’re naturally low in calories. When cooked, their antioxidant (lycopene) content increases which can help protect you from certain cancers and also give your skin a healthy, youthful glow; but they are still loaded with health benefits when eaten raw. And, I recently read that tomatoes are an aphrodisiac which might be the reason behind that healthy glow.

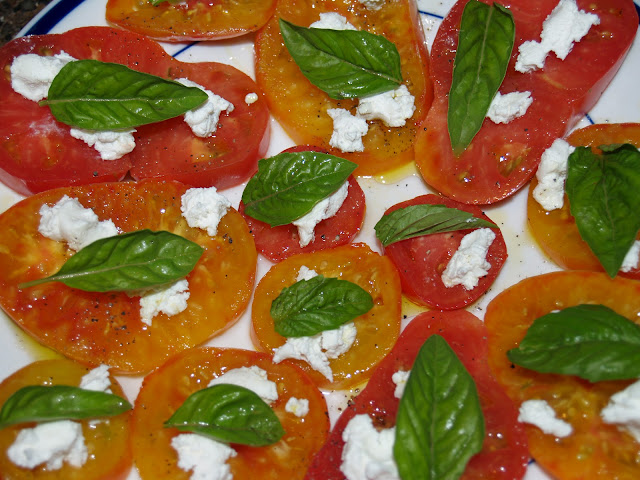
Heirloom or not, if you grow your own tomatoes or buy them at a farmer’s market, you know how amazing they taste with little or no enhancement. Their intense flavor can stop you in your tracks. I like them naked, or with a simple dusting of sea salt, pepper and a drizzle of olive oil. Here I have some with goat cheese and basil….


 And here they are made into a pizza…


Enjoy your fresh garden or farmer’s market tomatoes now….in a month or so they’ll be a distant, fond memory, but something to look forward to next summer for sure.

"The Greatest Wealth is Health" - Roman Poet Virgil

"Let Food be thy Medicine and Medicine be thy Food." - Hippocrates

Thursday, August 9, 2012

Pistachio-Herb Pesto


If you have a garden, you most likely have an overload of fresh herbs this time of year and making pesto is probably on your to-do list.  Here is a recipe I’ve been making for a few years now and it’s truly wonderful.  It uses a variety of fresh herbs, lemon zest and pistachios – one of my favorite nuts.  You can use any nut you like, I think walnuts would also work well with this recipe or you could use the traditional pesto nut: pine nuts. 

The list of health promoting properties that fresh herbs have is enormous.  For example, parsley which is a main ingredient in this pesto helps with circulation and is a natural diuretic.  Rosemary is a powerful antioxidant, stimulates the immune system and fights the signs of aging.  Oregano is also a potent antioxidant and anti-inflammatory agent.  And the list goes on and on…

There are unlimited uses for pesto with pasta being the most popular; you can also add it to soups, serve over grilled chicken or shrimp, or use it as a topping for bruschetta.  My favorite way to use this pesto is on pizza.  Here is a photo of a pesto pizza I recently made, very simply with some Asiago cheese, a small amount of tomato sauce and fresh tomatoes.  We were in total pizza heaven – it was so good .  Pair it with a bold red and Bob’s your uncle.
Enjoy!


Pistachio-Herb Pesto

1 small clove of garlic, peeled
2 cups packed Italian (flat-leaf) parsley
1/2 cup fresh basil
2 Tablespoons fresh lemon-thyme leaves
1 Tablespoon fresh sage leaves
1 Tablespoon fresh oregano leaves
1 Tablespoon fresh rosemary – chopped
½ cup fresh grated Parmesan cheese
¾ cup roasted & lightly salted pistachios
zest of one lemon
salt & pepper to taste
2/3 cup olive oil

In a blender or food processor, pulse the garlic until finely chopped.  Add all herbs, cheese, pistachios, lemon zest, salt & pepper to the garlic and blend until finely chopped.  With the blender/processor running, add the olive oil in a steady stream until the mixture becomes creamy and emulsified.  You may need to add more salt or pepper at this point.  Use immediately or when cool, can be refrigerated for a couple of days or freeze for later use.


"The Greatest Wealth is Health" - Roman Poet Virgil

"Let Food be thy Medicine and Medicine be thy Food." - Hippocrates

Tuesday, June 19, 2012

Lemon-Thyme Bars


I don't bake a lot these days because I don't like to have too many sweet treats around tempting me to eat them!  So when I do bake it's usually for a special occasion or I'm entertaining.  One dessert I've made several times over are these little lemon-thyme bars.  If you like lemon, you must try these bars.  They are loaded with lemon flavor and small enough not to feel guilty if you have one (or quite possibly three...) 

I came across this super easy recipe a few years ago from Giada de Laurentiis on The Food Network and they always get rave reviews every time I make them.  I love adding fresh, savory herbs to desserts which is common in Italian baking, with thyme being one of my favorites.
I love the smell of fresh thyme and have a huge crop of lemon-thyme growing in my garden that returns year after year.  I keep small clay pots of silver thyme around in the summertime just because I think it looks so lovely.  And of course the lemon juice and zest add intense flavor to these bars.


Lemon-Thyme Bars

1 stick (4 ounces) unsalted butter, at room temperature
1 cup all-purpose flour
2 tablespoons chopped fresh thyme leaves
1/2 teaspoon fine sea salt
1/2 cup powdered sugar
2 tablespoons fresh lemon juice
1/2 teaspoon pure vanilla extract
zest of one lemon


Glaze:
2 tablespoons fresh lemon juice
1/2 cup powdered sugar
lemon zest

1.) Preheat the oven to 325 degrees F. Butter and flour an 8 by 8-inch glass baking dish.

2.) In a small bowl combine flour, thyme and salt. Set aside.

3.) Using a stand mixer fitted with the paddle attachment or hand mixer, beat together 1 stick of butter and powdered sugar on high speed until light and fluffy, about 30 seconds.

4.)  Beat in the lemon juice, zest and vanilla. Reduce the speed to low and gradually add the flour mixture.
5.) Using damp fingers, press the dough into the prepared pan. Bake for 30 minutes until golden. Cool for 30 minutes.
For the glaze:
In a medium bowl, whisk the lemon juice (more lemon zest if desired) and powdered sugar together until smooth.  Spoon the glaze over the cooled crust. Allow the glaze to harden, at room temperature, for at least 1 hour.  Cut into 16 squares.

Enjoy!


"The Greatest Wealth is Health" - Roman Poet Virgil

Tuesday, May 22, 2012

Spinach-Berry Smoothie


A few times a week I make one of these smoothie concoctions for breakfast.  It fills you up and it's a great way to get more leafy greens and fruits into your diet without even thinking about it.  It may seem odd at first to include spinach in a smoothie, but fresh baby spinach has a very mild taste, so the rest of the fruits you add will flavor your smoothie and you won't even know the spinach is there.  I've experimented in the past with fresh broccoli and, well, I don't use it anymore.   I love broccoli but it doesn't make for a desired smoothie ingredient...at least not for me.

Besides being incredibly healthy, a smoothie allows you to be creative by customizing it to fit your tastes and to use up whatever you have on hand.  I tend to use raspberries and blueberries quite often but really any fruit will work - from strawberries to avocados.  One of my favorites is cocoa powder, banana and peanut butter.  You can also change up the liquid you use - water, milk, almond milk or juice works just fine.

A couple things to keep in mind when making a nutrient-rich smoothie-

Protein powder:

I use this as an opportunity to add to my days' worth of protein needs. I use an unsweetened, vanilla protein powder which is a whey concentrate from grass-fed cows.  A lot of protein powders out there contain artificial sweeteners so make sure to stay away from them. You can find protein powder in most grocery stores or health food stores, or you can buy them on-line. You can also use one cup of Greek yogurt to increase the protein content if you don't want to use a protein powder.

A banana makes it better:

Because the protein powder is unsweetened, it's important to include a banana or some other sweet fruit like mango or pineapple.  I add berries - raspberries, blueberries or strawberries - which add some sweetness but I've found that in addition to the berries,  a banana really adds to the overall taste.  I keep peeled, sliced bananas in the freezer to use in my smoothies.  This also helps with the "creaminess" factor.

Of course you don't need to add greens to make your smoothie taste good, but why not bump up the nutrient factor while you're at it?  You could use kale in your smoothie, which is another excellent "green" but I prefer baby spinach because of the mild taste.  And, spinach juice is loaded with great health benefits:  it's a great source of vitamin A, C, K, fiber, iron, folate and lutein.

Please note, the color of your smoothie will no doubt vary with the fruits you choose and the amounts.  If you use a chocolate flavored protein powder and add blackberries or blueberries, you're going to end up with a brownish colored smoothie which really doesn't look that appetizing, but will still taste good I assure you.  Whenever I make one of these my husband gets a bit squeamish (he hasn't yet embraced my spinach smoothie adventure) which prompts me to enthusiastically ask him every time if he wants some.  (I terrorize, why? because I love.)

Here is my recipe for the Spinach-Berry Smoothie I make most often.  Please know this is not an exact science.  Add more fruit, liquid or ice to suit your preferred taste and texture.  Enjoy!

 
Spinach-Berry Smoothie

1-2 cups fresh baby spinach
1/3 cup frozen raspberries
1/3 cup frozen blueberries
1 banana
1 scoop vanilla flavored protein powder or yogurt
3/4 cup water (or milk)
handful of ice

In a blender add the ice, frozen berries, protein powder (or yogurt) and banana.  Add spinach last.   Pour whatever liquid you are using to cover the ice - you may need more if you've added extra ingredients.  If your blender has an ice crush button, press that for 30 seconds, then mix & puree. 


If the spinach doesn't blend in by itself, remove the lid and push it down with a spatula. 


A few more seconds of liquefying and you're good to go.


"The Greatest Wealth is Health" - Roman Poet Virgil

"Let Food be thy Medicine and Medicine be thy Food." - Hippocrates

Tuesday, April 3, 2012

Life Without Bread (Baby I'm-a Want You)


In an effort to shed a few pounds, we are most often advised to cut back on starchy carbohydrates and for most of us that means the soft, chewy stuff we like to sink our teeth into:  bread.  I've tried this and life without bread really is no fun, unless of course we're talking about the 70's folk-rock band Bread, and in that case I think I could be happy without that bread in my life (sorry Bread fans!)

Eliminating bread from ones' life may work for some people, but it makes me one cranky mama which isn't good for anyone.  Consuming moderate amounts of  carbohydrates releases "feel-good" endorphins in the body which reduce stress, ease anxiety and create a sense of pleasure.  I definitely need those endorphins on a daily basis.

The good news is I've found an alternative to regular bread:  sprouted-grain bread.  Whole-grain bread is always recommended over white bread because it's more nutritious, but if you want to take it to eleven, try sprouted-grain bread.  It's flourless and made from organic, sprouted grains, and it contains all 9 essential amino acids making it a complete protein.  Sprouted grain is better for us because it's more nutrient dense, it's digested easier, contains more protein and less starches and has a lower glycemic index making it more suitable for those suffering with blood sugar issues.

You can easily find sprouted-grain bread in your grocer's freezer.  The kind I eat is Ezekiel 4:9 from Food for Life.
Here are the plain and simple ingredients:

Organic Sprouted Whole Wheat, Filtered Water, Organic Malted Barley, Organic Sprouted Whole Millet, Organic Sprouted Whole Barley, Organic Sprouted Whole Lentils, Organic Sprouted Whole Soybeans, Organic Sprouted Whole Spelt, Fresh Yeast, Sea Salt

There are definitely occasions when I eat regular bread, white even, when it's in the form of pizza, but I do make a habit of eating sprouted-grain bread on a daily basis.  It took a while, but my husband eats it now too.  If you're not already eating a good quality whole-grain bread, eating sprouted-grain bread may take some getting used to, but you may find as I do that it tastes just like a hearty, whole-grain bread.  You can also try the sprouted-grain English muffins which are outstanding and far superior than the regular version.  And, the fact that my 10-year-old, who is the PICKIEST EATER IN THE WORLD (not exaggerating) eats this bread, makes me one happy mama.


"The Greatest Wealth is Health" - Roman Poet Virgil

"Let Food be thy Medicine and Medicine be thy Food." - Hippocrates

Wednesday, February 29, 2012

Artichoke Gratinata


My paternal Grandfather was born on the outskirts of Palermo, Sicily and made his way to Ellis Island when he was only three years old.  His family lived in New York for a while before being placed with relatives in Southern Wisconsin.  With the influence of his Sicilian parents, he was an excellent cook and could always be found in the kitchen whistling while he prepared a meal.  One of his specialties was stuffed artichokes - full of breadcrumbs, butter, Parmesan cheese and garlic - a true Sicilian delicacy, one that took time and care and if you were lucky, was personally delivered to you on special occasions.

Today, most of the world's artichokes come from Italy, France and Spain; while California provides almost 100% of the U.S. artichoke crop.  There are several different varieties of artichokes, but all have the same, wonderful health benefits.  Artichokes are full of Vitamin C, folate, dietary fiber, magnesium and potassium.  They can help "clean" your blood by detoxifying the liver and gallbladder.  They have been known to help with circulation and digestive health, and through the ages, Europeans and Egyptians believed that the artichoke enhanced sexual power and aided in conception.  So there you have it - many fun reasons to eat your artichokes.

Every bite of this Artichoke Gratinata tastes like the treasured leaf of a stuffed artichoke.  The recipe comes from one of my favorite Food Network chefs, Giada De Laurentiis, and will compliment a variety of main courses; or simply pair it with a mixed-green salad and bottle of wine.  Enjoy!


artichoke gratinata (food network photo)

 Artichoke Gratinata

3 Tablespoons olive oil
1 garlic clove, minced
1 pound frozen artichoke hearts, thawed  (Trader Joe's has the best)
2 Tablespoons chopped fresh parsley leaves
3/4 teaspoon salt
1/4 teaspoon freshly ground black pepper
1/8 teaspoon red pepper flakes
1/2 cup chicken broth
1/4 cup Marsala wine
1/3 cup bread crumbs
1/3 cup grated Parmesan cheese
2 Tablespoons melted butter

1.)  Preheat the oven to 450 degrees F.
2.)  Warm the olive oil in a heavy bottom skillet over medium-high heat.
3.)  Add the garlic and cook for 1 minute. Add the artichoke hearts, parsley, salt, pepper, and red pepper flakes and cook until the artichoke hearts are starting to brown at the edges, about 3 minutes.
4.)  Add the chicken broth and wine and simmer for 3 minutes.
5.)  Transfer the artichoke mixture to a 2-quart baking dish.
6.)  Melt the butter in the same skillet used to cook the artichokes.
7.)  In a small bowl mix the melted butter with the bread crumbs. Stir in the Parmesan and top the artichokes with the bread crumb mixture.  
8.) Bake until the top is golden, about 10 minutes.

"The Greatest Wealth is Health" - Roman Poet Virgil

Tuesday, February 14, 2012

Ciocolata! Chocolate Mousse


Chocolate...is there anything it can't do?  I've said this before, but I love chocolate and I eat it everyday.  In fact, I will go so far as to say I need chocolate everyday.  In addition to the health benefits dark chocolate provides, it's also an excellent mood enhancer.  My husband occasionally suggests to me - as diplomatically as possible - "I think you need some chocolate..."  To which I want to reply, "You don't tell me when I need chocolate, I tell you when I need chocolate!" But before I blurt this out, I realize how ridiculous it sounds and then I'm just thankful someone is ordering me to eat chocolate.

But not all chocolate is created equal.  To achieve any health benefits at all you must consume chocolate that is 70% cocoa or higher.  The greater the cocoa mass, the greater the health benefits.  Cocoa beans are bitter and full of an antioxidant called phenol.  But when processing begins, most chocolate loses a lot of its antioxidant properties and when processed with milk and sugar (milk chocolate) it can actually negate most of the antioxidant activity.  So by sticking to a higher cocoa percentage such as 70%, 85% or even 90%,  and keeping the portion size to 1-2 squares a day, you're sure to gain the health benefits without all the added sugar and impurities. 


If you're used to eating milk chocolate, you'll need to work your way up the percentage ladder slowly.  Start with 60% cocoa chocolate chips (Ghirardelli chips are wonderful ) and move on from there.  The high sugar content in milk chocolate makes you crave more sugar which is why it can be hard to stick to 1-2 squares at a time. I find dark chocolate to be much more satisfying because of the intense chocolate flavor; and because of the very low sugar content, I'm not immediately craving more which means I can stick to a small amount - albeit daily...   I love to enjoy my chocolate with a cup of hot tea - the 90% cocoa squares literally melt in your mouth.

I recently came across this easy recipe for chocolate mousse in the food section of the Chicago Tribune, and love the fact that it only uses three ingredients.  It's super easy and luxurious, but also very rich - making it a great treat to share.  Enjoy!
                           
Chocolate Mousse
makes 4 servings

1 cup whipping cream
2 1/2 oz good quality chocolate (70 %)
1/2 teaspoon pure vanilla extract

1.)  Finely chop chocolate and place in a large bowl; set aside.
2.)  In a small, heavy saucepan, heat 1/4 cup of whipping cream to a boil, do not scorch.
3.)  Pour hot cream over chopped chocolate and let melt for 2 minutes; whisk until smooth, set aside to cool.
4.)  In a separate bowl, whip 3/4 cup of chilled whipping cream just until stiff peaks form, be careful not to over whip.
5.)  Gently fold half the whipped cream into the chocolate mixture.  Fold in remaining whipped cream and mix until smooth.
6.)  Spoon into 4 small ramekins or small cordial/wine glasses.  Cover and refrigerate for at least 2 hours.
7.)  Let sit at room temperature for about 10 minutes before garnishing them with berries or more whipped cream.


"The Greatest Wealth is Health" - Roman Poet Virgil

Tuesday, January 24, 2012

Vitamin C: It's Not Just for Scurvy Anymore


This time of year we tend to increase our intake of Vitamin C because we've always been told that it can boost our immune system and ward off a cold.   However, we'd be better off if we added more Vitamin C to our diets year round.  Two reasons:  One - It can help us live a longer, healthier life and Two -It can help us look better as we age.

First let's look at the health benefits:

Vitamin C is a powerful immune-boosting antioxidant that is absolutely vital to our good health, but our bodies cannot store it so it needs to come from our daily diet or from supplements.  Vitamin C fights carcinogenic free radicals, protects DNA from being damaged and can prevent hardening of the arteries.  It can also promote healing of all body cells, help detoxify our bodies, keep our gums healthy, combat stress, act as an anti-depressant and surprisingly, so much more!  Nobel prize winner, Dr. Linus Pauling, said we could add 12-18 years to our lives if we took 3-12 grams (3,000 - 12,000 milligrams) of Vitamin C daily.  He himself claimed to have lived an extra 20 years because of all the Vitamin C he took everyday.

Now let's look at it's beauty properties:

Vitamin C helps to produce natural collagen, which helps the skin to retain elasticity, and keeps our skin radiant and youthful.  As we age, the collagen in our skin breaks down causing wrinkles and sagging.  While there are many factors other than age that can cause our skin to wrinkle and sag (like too much sugar, alcohol or smoking), the good news is Vitamin C can actually reverse  some of these signs of aging.   Some studies suggest that people who eat foods rich in Vitamin C have less wrinkles (because of its collagen building properties) and less age-related dry skin compared to those whose diets contain small amounts of Vitamin C.  Other studies say ingesting large amounts of Vitamin C does little to get rid of your wrinkles and that it's best to look for a skin treatment that includes Vitamin C.

Since the jury is still out, I'm doing both by exceeding the Recommended Dietary Allowance of Vitamin C (a mere 70-90 milligrams a day) by taking the suggested daily recommendation for longevity and optimal health which is 1,000 - 3,000 milligrams.   I also use cleansing and moisturizing products with Vitamin C.  For a while now I've been using (and loving) Avalon Organics' Vitamin C line which is affordable and available at Target, and has a wonderful orange scent to it.

The best way to get your Vitamin C is through your food; raw red peppers, orange juice, kiwifruit, broccoli - are all excellent sources of Vitamin C but to get to 3,000 mg, you'd be eating more red peppers and broccoli than humanly possible in a 24 hour period.  To ensure that I'm getting the amount I want, I take an Emergen-C packet daily which has 1,000 milligrams of Vitamin C plus a lot of great B-complex vitamins in it to boot.  I also take two 1,000 milligram Vitamin C tablets a day.  This way when a new study comes out that confirms you really can get rid of wrinkles with large amounts of Vitamin C, I'll be ahead of the game...and who knows, with copious amounts of Vitamin C, I could still be around then.

"The Greatest Wealth is Health" - Roman Poet Virgil

Tuesday, January 10, 2012

Olive Oil, Honey & Egg Yolk Facial Mask


   I love the way my skin feels and looks after getting a spa facial but I don't like having to pay a king's ransom to get one.  Therefore in my search for an inexpensive alternative, I've been making this one at home for years.  With just three simple ingredients that you'd be hard-pressed not to find in your kitchen, you've got the makings for a fabulous, moisturizing facial mask.
   I am a firm believer that to achieve healthy, glowing skin so much more depends on what you put in your mouth than what you put on your face which is why I love this easy, inexpensive mask recipe.  You don't have to spend a lot of money on expensive creams and lotions as long as you're feeding your body with proper nutrition, foods that give you a natural, healthy glow and keep you well-hydrated.  However, sometimes we need a little extra help in the "glowing" department so it's nice to know we can pamper ourselves naturally with something we can easily whip up at home.
   First, here are the benefits of the three ingredients:
   Egg Yolk - Eating egg yolks can make your skin smooth and help preserve your skin's elasticity.  When applied to your face, the egg yolk will help remove oil and dirt from your skin and will also help to make the mask smooth and creamy when you apply it to your face.
   Honey -  Honey has been used for ages as an anti-bacterial agent - you can put honey on an open wound and it will heal faster.  Using honey in the mask will gently clean your skin, making it healthy and supple by killing germs and reducing swelling and inflammation.
   Olive Oil - is there anything it can't do?  It truly is the elixir of  the Gods.  Sophia Loren is said to bathe in the stuff as well as ingest two tablespoons a day (neat) which has been attributed to her ageless beauty.  You can remove your eye make-up with olive oil, use it as a night cream and an all-over skin and hair moisturizer.  In this mask, the olive oil will nourish and clean your skin, and will easily rinse away leaving your skin moisturized and glowing.

1.)  Separate one egg  - using only the yolk - in a small bowl or ramekin
2.)  Add 1 teaspoon of honey and 1 teaspoon of olive oil
3.)  Mix until combined and smooth;  apply to a clean face.  Rest with it on your face for about 15 minutes then rinse with warm water.  I like to do this mask right before a shower because it can get kind of sticky and hard to get out of your hair. 
   Your skin will be well-moisturized, smooth and glowing.  You can store the extra mask in the refrigerator for about a week or so and use it as often as you like.
    “Beauty is how you feel inside, and it reflects in your eyes. It is not something physical.”  - Sophia Loren